If any of you have been wondering why you haven’t seen me for around the past few weeks or why my Snapchat stories feature a lot of late night timestamps and coffee, I have one word for you: “Graphics.”
Namely, computer graphics. Introduction to Computer Graphics (CS 488) is a fourth-year course offered by the University of Waterloo’s Computer Science department, and is one of the “Big 3” courses offered by the CS faculty - that is, one of the three “hardest” or most demanding undergrad courses available.
While definitely the most time consuming course I’ve taken this term (and arguably my entire university career), its also been one of my favourite courses. I wanted to take this opportunity to outline some of the cool things I’ve done and share what I’ve taken away from this class.
Assignments
As the web homepage of this course mentions, Graphics is a deliverable-heavy course. While the lecture content teaches you the theory behind major concepts used in the field, the assignments give you a list of requirements you must meet, and let you roam free. It’s up to you to figure out how to implement the required features and functionality. This involves coding. A LOT of coding.
Assignment 1 - An Intro to OpenGL
The first assignment made sure we had a basic understanding of OpenGL, the framework used for the following three assignments. OpenGL is a cross-platform programming interface for your graphics card, and allows you to interact with and manipulate your 3D graphics environment and draw content to your screen.
The goal of the first assignment to make you familiar with the C++ API, and have you create an interactive application where you can select an active cell in a grid and manipulate the height/colour of each cell. The result was actually kind of fun to play around and make cool structures with:
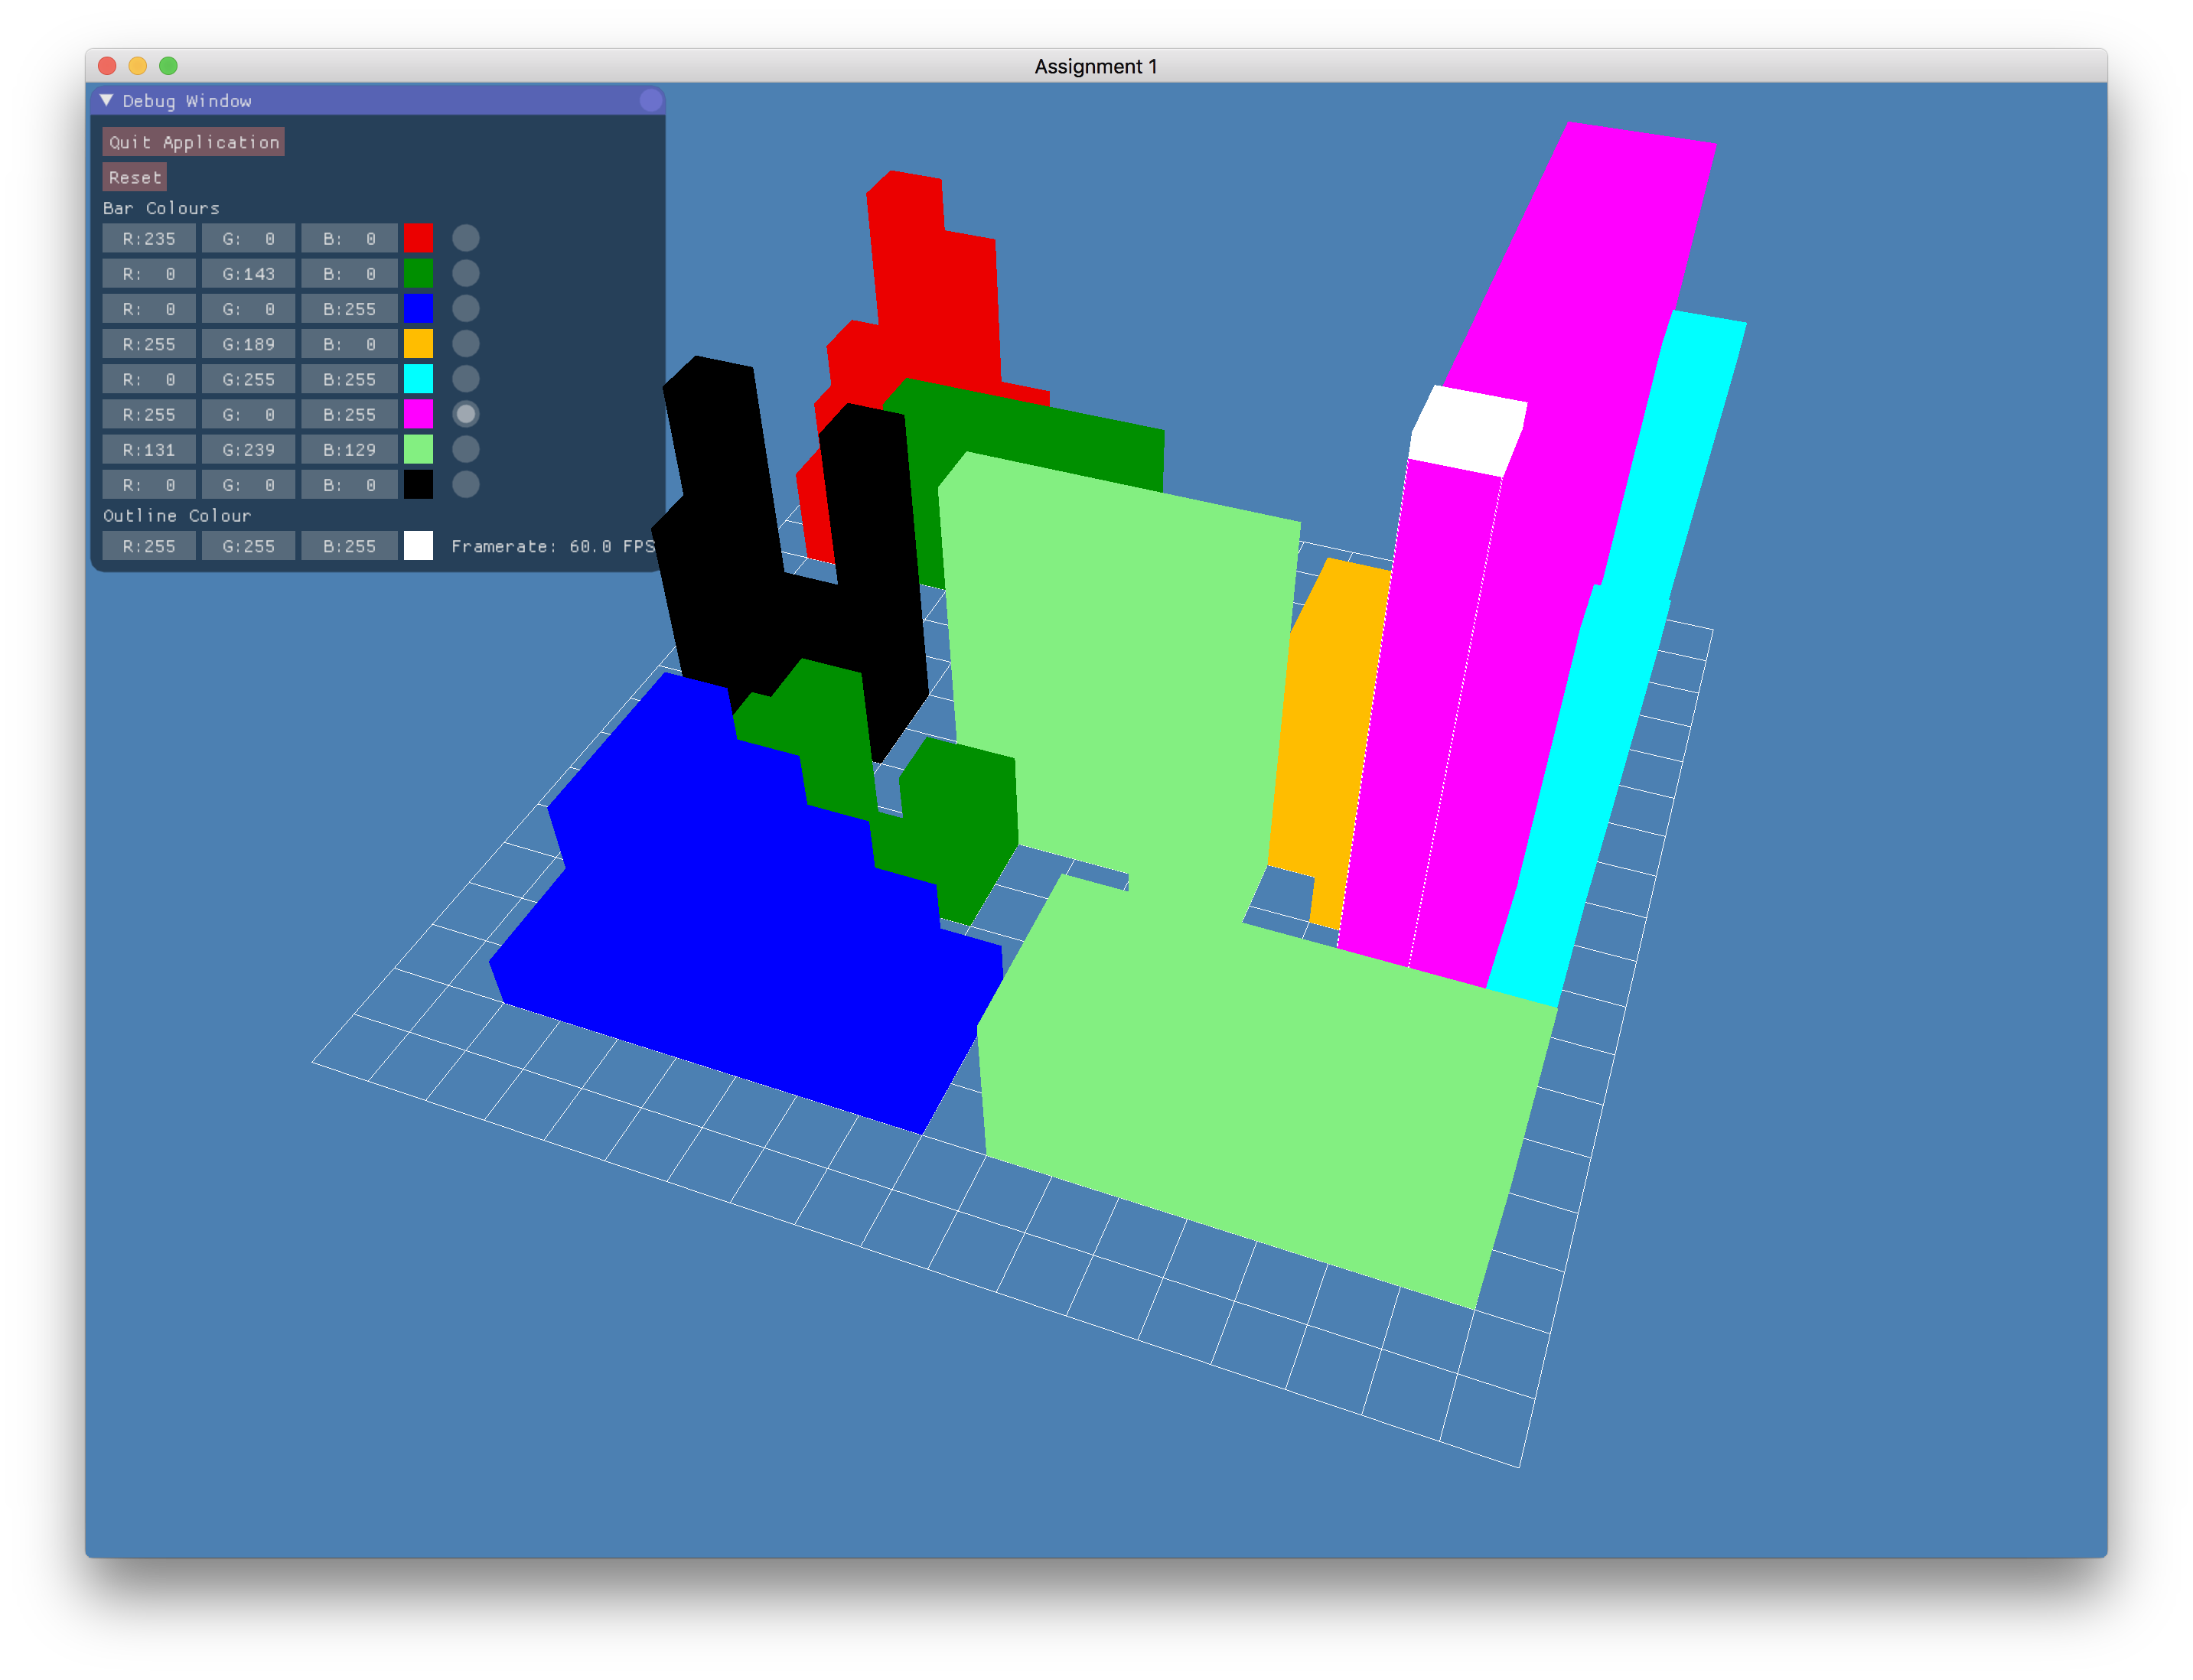
The application let you select the height of a cell, grow/shrink it’s contents, copy over the stack of cubes to an adjacent cell, and/or change the cell’s color. To me, the coolest part of this assignment, was the fact that you only had to really “draw” a cube just once, and reuse this model over and over by applying different transformations to it. This is a core concept used in video games, movies, and other applications - instead of specifying the coordinates and models for every single object on the screen, create a certain number of models and draw instances of them to various places.
Assignment 2 - Back to the Basics
An fundamental concept in computer graphics is the forward projection pipeline. This is the idea of starting with “world coordinates”, or three-dimensional coordinates of everything in your scene, and transforming it into two-dimensional coordinates (given a hella lotta math) to correspond with your screen coordinates using a variety of matrices and mathematical formulae.
The second assignment dealt with transformation of a wireframe cube, and being able to translate, rotate, and scale it around the world coordinate axes, or it’s own (internal) axes. While this sounds simple enough, the caveat was that we could not use ANY OpenGL utilities to do so. All transformation matrices, such a perspective projection to give the scene depth, had to be implemented by hand. Although it didn’t look like it took that long (a cube must be simple, right?), 20 or so hours later I came up with this:
An interesting tidbit to note is that the background in both assignments so far
is a nice pale blue. Why blue? Simply put, it’s one of the least distracting
colours and allows the user’s focus to be shifted onto the foreground and
actual content of the application.
Assignment 3 - Puppets!
While the course content didn’t heavily discuss this next section, hierarchial modelling is a powerful tool that allows people to create complex objects and models on the screen. Shapes are created and “attached” to other shapes in a tree-like fashion, so that transformations that are applied to any node propagate to all child nodes in the tree. A humanoid-like figure could be modelled as such:
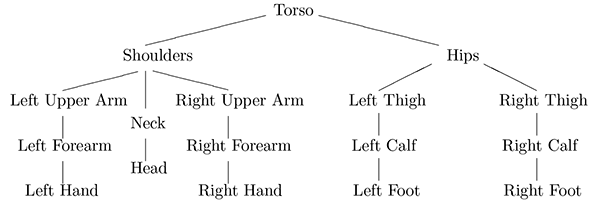
Our goal for this assignment was to model pretty much anything we wanted, so
long as we met a specific minimum number of manipulatable nodes. That is,
allowing the user to select joints in your puppet, apply rotations to said
joint, and have everything attached to the joint also rotate accordingly -
similar to how your neck, head, and any accessories on your face change
position when you rotate your torso.
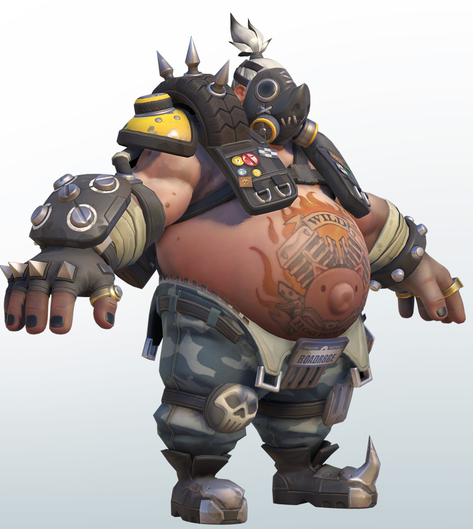
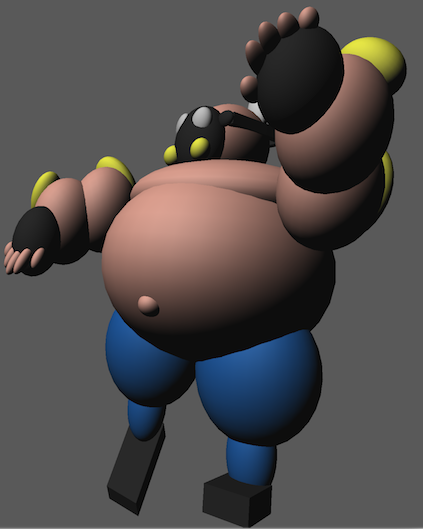
Influenced by the game I was currently using to procrastinate at the time, I decided to model a character from the popular video game Overwatch. Below, you can see a side by side comparison of the character Roadhog, with the reference photo I used on the left and the model I created using only spheres and cubes on the right.
And while I didn’t spend as much time as I’d have liked to adding detail to the model, I was proud of the joint manipulation I implemented. A cool part of this was “picking” - allowing a two-dimensional click to be translated into an interaction with an object in three dimensional space, and how OpenGL specifically lets you do that. For those of you who are super interested, the “open-gl tutorial” series has a great explanation on how this works, but for the rest, here’s a quick demonstration of what I mean:
As you can probably tell, I got a little carried away playing around with my
puppet as I was building it. Those friends who received numerous Snapchats of
my puppet “dabbing” will attest to it.
Assignment 4 - Ray Tracing
This final course assignment flipped everything upside-down when introducing ray tracing. Unlike the conventional forward projection graphics pipeline mentioned above, ray tracing works backwards. The idea behind ray tracing is that your eyes see things when light from some source bounces an object and goes directly into your eye. Instead of transforming model coordinates to coordinates on your screen, ray tracing involves working backwards and casting a directional “ray” from your eye towards the screen, and performs intersection calculations with everything in your world. That ray can then reflect and refract off objects it collides with, and if it eventually hits a light source, it must be illuminated.
This is definitely a gross oversimplification, and is easier said than done. Unlike OpenGL, ray tracing does not involve sending vertex information to your graphics card. Rather all the calculations are performed on your CPU, and the computationally intensive part is performing intersection calculations with every object in your screen. While intersections may be easy with simple primitives, most objects are not simple and are created using hundreds if not thousands of primitives.
Take for example the cows in this scene:
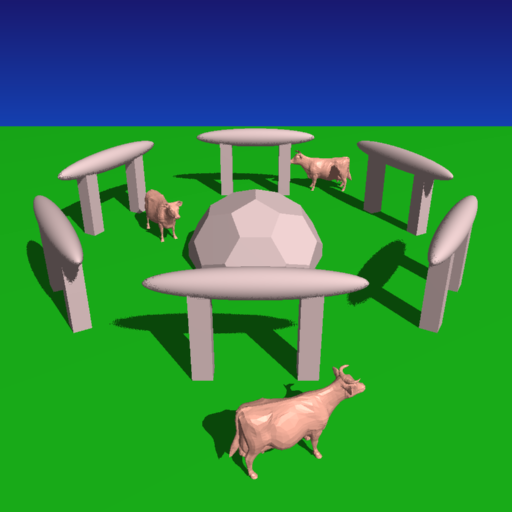
I definitely didn’t model the cows myself - that model was provided by the course staff. However, each one of those cows has over 5800 triangular faces. When combining that with casting rays from every pixel on your screen, you can see why a simple image like that took (without many optimizations) over 20 minutes to render.
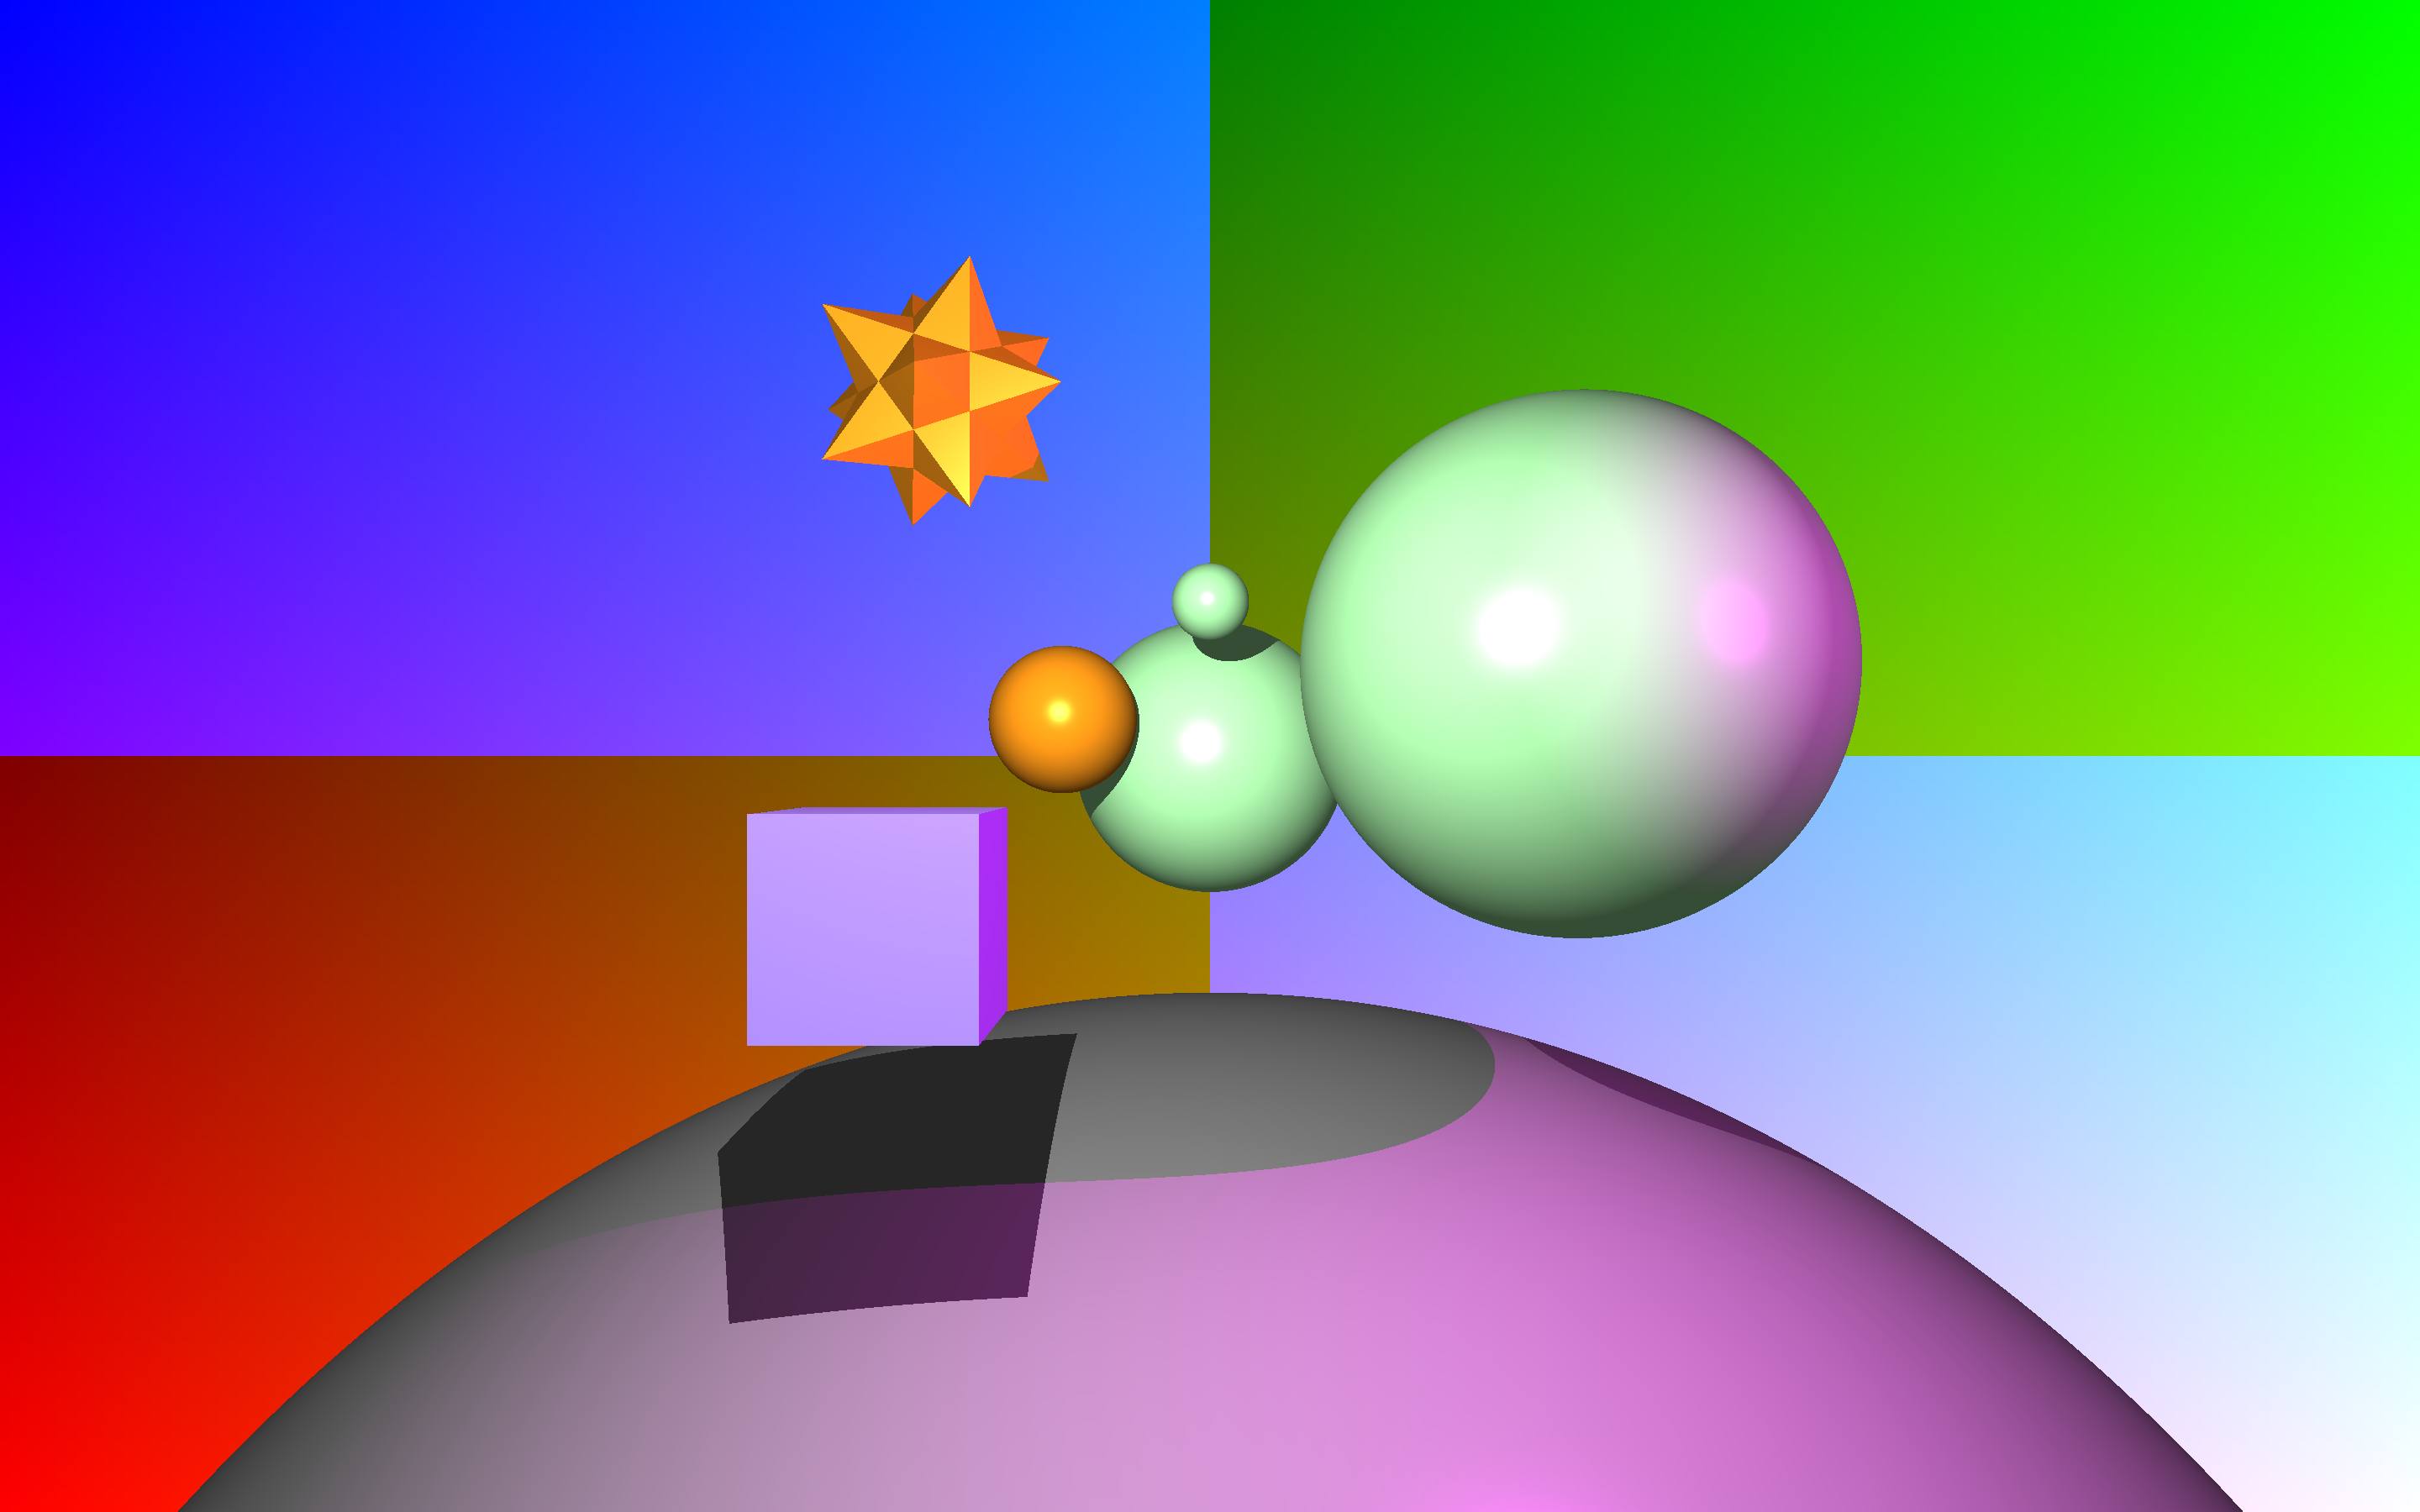
However, ray tracing is a field in which people are constantly pioneering techniques and optimizations in order ensure this approach is practical and feasible to use. After implementing some of these optimizations, more complex and higher resolution images were able to be rendered in much shorter periods of time, such as the following scene where you can see the use of an illumination model, perspective depth, and shadows being demonstrated:
Project
The final deliverable for the course was the all-encompassing project. The intent here was select either OpenGL or ray tracing, research various graphical techniques related to your selection and use those techniques to implement something cool. We were given the opportunity to either extend our ray tracer from A4 or build an entirely new OpenGL application.
Being the gamer nerd I am 🤓, I chose to make an OpenGL-based game, and that’s what I’ll describe below. If however you’re more interested in seeing what a ray tracer project looks like, my good friend and classmate Geoffrey Yu took this course in the same offering I did and posted the results on his website. Graphics techniques aside, those images are hella neat!
Although the core idea of my game shifted as I began developing it, a percentage of the marks for the project were allocated towards meeting objective goals outlined in the proposal. Basically, if you said you would implement something, it had to be implemented using the specified technique(s). The remaining marks were distributed subjectively, in categories such as polish, user interface, humour, and difficulty of techniques.
Additionally, the previous 4 assignments put together accounted for 24% of the course mark and this project was 26%, so it was only fair I spend an equivalent amount of time on the project. Including the time spent researching and drafting up a proposal (yes, with references to technical papers, scholarly journals, and the like), implementing the project and making sure it worked on both my personal and university lab machines, and writing up a detailed 20-page coil-bound technical documentation outlining the implementation of each technique and objective, I spent about 100 hours on this project over the course of 2 weeks.
In the end, I made “Puppet Run”, re-using my puppet and models from previous assignments to create a platformer where your player (the puppet) must keep running, jumping to avoid obstacles and using the projectile launcher to destroy enemies in its path. The platform positions, enemies, and enemy movements are all randomized, the projectile can be aimed and explodes on impact, and a physics system with gravity, friction, and collision detection is in place to make sure your player can actually move around and interact with the world.
There are tonnes of improvements I would love to add given the chance, but ultimately I was proud of what I managed to accomplish in such a short time frame. Check out a demo of my game below!
Final Thoughts
Looking back through the term as I prepare for the final exam this week (wish me luck!), I realized the amount of content and scale of this course. To anyone considering it, definitely step back and think about how much time you want to dedicate, both in terms of lecture content and time spent outside of class learning how to implement everything you need. Most of the application of graphics is not taught in lecture, and the implementation details are left entirely up to you. However, if you do put the time into understanding the content and completing the required coursework, you’ll be amazed at how much you’ve learned and the insights you’ve gained into the graphics industry.
Do I regret sacrificing all that sleep just to stay up and work on this course’s deliverables? Absolutely not. The course represented a beautiful marriage between the theoretical understanding of graphics techniques and their practical application in real-world scenarios. I’ve never felt as accomplished as I did when demonstrating my project to my instructor, when hours and hours of hard work came together to create something both technically challenging and fun to use! And regardless, a blog post about how much sleep I got this summer just wouldn’t be as fun would it?
I’d like to give special thanks to Prof. Gladimir Baranoski for his instruction, support, and unique teaching style throughout the term, to Joey de Vries and his incredibly helpful Learn OpenGL tutorials that got me through the course, and my roommates for not complaining too much about my incessant keyboard-clacking late at night for days on end.
Thanks for taking the time to stop by and read this post! Have any questions? …thoughts? …suggestions for improving my (first full length) blog post? Feel free to leave a comment below!